 SpringMVC介绍
# 4.1 Spring MVC 介绍
以前,我们大量的使用 JSP + Servlet 技术开发 Web 应用。通过使用 jstl 技术( Java server pages standarded tag library,即 JSP 标准标签库)封装一些常用组件,简化前端 jsp 页面的开发。
那个时候时间过得很慢,
慢到只用一种技术规范,
就可以...
开发 Web 应用一辈子。
现在,我们更多的是使用前后端分离的 MVVM 技术来构建 Web 应用。例如前端使用 vue,后端使用 rest 方式(Representational State Transfer)开发业务功能接口,供前端应用通过 ajax 方式调用。
MVVM:Model-View-ViewModel 的简写,它本质上就是 MVC 的改进版。
无论是在以前还是现在,使用 Spring 开发 Web 应用,首选的都是 Spring MVC 开发框架。
Spring MVC 并不知道前端使用的视图技术,所以不会强迫您只使用 JSP 技术。实际上在 Spring Boot 2.0 框架中,Spring MVC 推荐使用 Thymeleaf 模板技术。
Spring MVC 分离了控制器、模型对象、分派器以及处理程序对象的角色,这种分离让它们更容易进行定制。
Spring 的 Web MVC 框架是围绕 DispatcherServlet 前端分发器设计的,它把请求分派给处理程序,同时带有可配置的处理程序映射、视图解析、本地语言(国际化,多语言支持)、主题解析以及上载文件等支持。默认的处理程序是非常简单的 Controller 接口,只有一个方法 ModelAndView handleRequest(request, response)。Spring 提供了一个控制器层次结构,可以派生子类。如果应用程序需要处理用户输入表单,那么可以继承 AbstractFormController。如果需要把多页输入处理到一个表单,那么可以继承 AbstractWizardFormController 这个类。
# 4.1.1 常用注解
Spring MVC 在发展过程中也经历了一段“黑暗”时间:非常繁杂的 xml 配置,简直就是 “xml hell”(xml 配置地狱,指繁杂到失控的 xml 配置信息)。后来,在使用注解以后,才简洁易用起来。
所以,要想了解、会用 Spring MVC 就必须掌握其最常用的注解。
# 4.1.1.1 @Controller
在 SpringMVC 中,控制器 Controller 负责处理由前端分发器 DispatcherServlet 分发的请求,它把用户请求的数据经过业务处理层处理之后封装成一个 Model ,然后再把该 Model 返回给对应的 View 进行展示。
在 Spring MVC 中定义一个 Controller 不需要继承某个父类,也无需实现某个接口。你只需要使用 @Controller 标记一个类是 Controller 即可。
前端分发器 DispatcherServlet 将会扫描使用了该注解的类的方法,并检测该方法是否使用了 @RequestMapping 注解。
@Controller 只是定义了一个控制器类,而使用 @RequestMapping 注解的方法才是真正处理请求的处理器。单单使用 @Controller 标记在一个类上还不能真正意义上的说它就是 Spring MVC 的一个控制器类,因为这个时候Spring 还不认识它。那么要如何做Spring 才能认识它呢?这个时候就需要我们把这个控制器类交给 Spring 容器来管理。
各位,是否还记得 Spring Boot 启动类的注解 @SpringBootApplication,这个注解是个复合注解,其中包含 @ComponentScan 会扫描到启动类包及其子包下的 Controller 控制器类,并将其加载到 Spring 容器中。
@ComponentScan(excludeFilters = { @Filter(type = FilterType.CUSTOM, classes = TypeExcludeFilter.class),
		@Filter(type = FilterType.CUSTOM, classes = AutoConfigurationExcludeFilter.class) })
public @interface SpringBootApplication {
	...
}
2
3
4
5
# 4.1.1.2 @RequestMapping
@RequestMapping 是一个用来处理请求地址映射的注解,可用于类或方法上。
当用于类上,表示类中的所有响应请求的方法都是以该地址作为父路径。
@RequestMapping 注解有六个属性,下面我们把他分成三类进行说明(下面有相应示例)。
- value, method:
value: 指定请求的实际地址,指定的地址可以是 URI Template 模式;
method: 指定请求的 method 类型,例如 GET、POST、PUT、DELETE等;
- consumes,produces:
consumes:指定处理请求的提交内容类型(Content-Type),例如 application/json, text/html;
produces: 指定返回的内容类型,仅当 request 请求头中的(Accept)类型中包含该指定类型才返回;
- params,headers:
params: 指定 request 中必须包含某些参数值是,才让该方法处理;
headers: 指定 request 中必须包含某些指定的 header 值,才能让该方法处理请求。
# 4.1.1.2.1 @PathVariables
用于将请求 URL 中的模板变量映射到功能处理方法的参数上,即取出 uri 模板中的变量作为参数。
@Controller
public class TestController {

     @RequestMapping(value="/product/{productId}",method = RequestMethod.GET)
     public String getProduct(@PathVariable("productId") String productId){
           System.out.println("Product Id : " + productId);
           return "hello";
     }

     @RequestMapping(value="/javabeat/{regexp1:[a-z-]+}", method = RequestMethod.GET)
     public String getRegExp(@PathVariable("regexp1") String regexp1){
           System.out.println("URI Part 1 : " + regexp1);
           return "hello";
     }
}
2
3
4
5
6
7
8
9
10
11
12
13
14
15
# 4.1.1.2.2 @RequstParams
用于在 Spring MVC 后台控制层获取参数,类似一种是 request.getParameter("name"),它有三个常用参数:defaultValue = "0", required = false, value = "isApp";defaultValue 表示设置默认值,required 通过 boolean 值设置是否是必须要传入的参数,value 值表示接受的传入的参数类型。
多数情况下 @RequestParam 可以省略。
@RequestMapping("genUsers")
public String genUsers(@RequestParam int count) {
    //public String genUsers(int count) {
    for (int i=2; i<count+2; i++) {
        String str = UUID.randomUUID().toString().substring(16);
        User user = new User();
        user.setId(i);
        user.setUserName(str);
        user.setRealName(str);
        user.setPassWord(str);

        userService.saveUser(user);
    }
    return "生成了" + count + "个用户。";
}
2
3
4
5
6
7
8
9
10
11
12
13
14
15
# 4.1.1.3 @ResponseBody
该注解用于将 Controller 的方法返回的对象,通过适当的 HttpMessageConverter 转换为指定格式后,写入到 Response 对象的 body 数据区。
返回的数据不是 html 页面,而是其他某种格式的数据时(如json、xml等)使用。
# 4.1.1.4 @ModelAndView
用来存储处理完后的结果数据,以及显示该数据的视图。从名字上看 ModelAndView 中的 Model 代表模型,View 代表视图,这个名字就很好地解释了该类的作用。业务处理器调用模型层处理完用户请求后,把结果数据存储在该类的 model 属性中,把要返回的视图信息存储在该类的 view 属性中,然后让该 ModelAndView 返回给 Spring MVC 框架。框架通过调用配置文件中定义的视图解析器,对该对象进行解析,最后把结果数据显示在指定的页面上。
public ModelAndView handleRequestInternal(HttpServletRequest request,
                                          HttpServletResponse response)throws Exception{
    ...
        Map<String,Object> model = new HashMap<String,Object>();
    if(courtName != null){
        model.put("courtName",courtName);
        model.put("reservations",reservationService.query(courtName));
    }
    return new ModelAndView("reservationQuery",model);
}
2
3
4
5
6
7
8
9
10
# 4.1.1.5 @RestController
@RestController 是一个复合注解,其作用等同于 @Controller + @ResponseBody。
@Target(ElementType.TYPE)
@Retention(RetentionPolicy.RUNTIME)
@Documented
@Controller
@ResponseBody
public @interface RestController {

	/**
	 * The value may indicate a suggestion for a logical component name,
	 * to be turned into a Spring bean in case of an autodetected component.
	 * @return the suggested component name, if any (or empty String otherwise)
	 * @since 4.0.1
	 */
	@AliasFor(annotation = Controller.class)
	String value() default "";

}
2
3
4
5
6
7
8
9
10
11
12
13
14
15
16
17
这个注解,大量地使用在前后端分离的应用中。
# 4.1.2 Spring MVC 剖析
要想彻底掌握 Spring MVC,就必须深入了解其设计、运行机制,才能做到“知其然,也知其所以然”。
当然,彻底掌握任何一个框架,都是通过阅读官方文档(绝大多数时候是英文的)和源码来完成的。
最早,Spring MVC 大部分场景是和 JSP 一起使用的,这里我们也以 JSP 为例,讲解其运行机理。
# 4.1.2.1 加载过程
Spring MVC 应用在启动过程中会创建两个 Spring 容器:基础容器(含 @Repository,@Service,@Component等组件)和控制器容器(含 @Controller)。
控制器容器容器“继承”自基础容器,所以在我们写的 Controller 里面可以注入 @Service 和 @Component 组件(当然,也可以注入 @Repository,只是基于事务管理绝对不推荐这样做),而 @Service 组件中不能注入 @Controller组件(因为创建基础容器时,还没有控制器容器)。
从依赖倒置原则来讲,@Service 组件绝对不应该依赖 @Controller 组件。
项目中,我们写在 Controller 中的、标注了 @RequestMapping 的方法(如下面代码片段的 getUser 方法),在启动时会被扫描后装入 DispatcherServlet 的 handlerMappings 属性中。
@RestController
@RequestMapping("/user")
public class UserController {

    @Autowired
    private UserService userService;

    @RequestMapping("get/{id}")
    public String getUser(@PathVariable int id){
        return userService.selectUser(id).toString();
    }
...
2
3
4
5
6
7
8
9
10
11
12
DispatcherServlet 的 handlerMappings 属性中存放了 Spring MVC Web 应用的所有路径映射处理器。
@SuppressWarnings("serial")
public class DispatcherServlet extends FrameworkServlet {
...
	/** List of HandlerMappings used by this servlet. */
	@Nullable
	private List<HandlerMapping> handlerMappings;
...
2
3
4
5
6
7
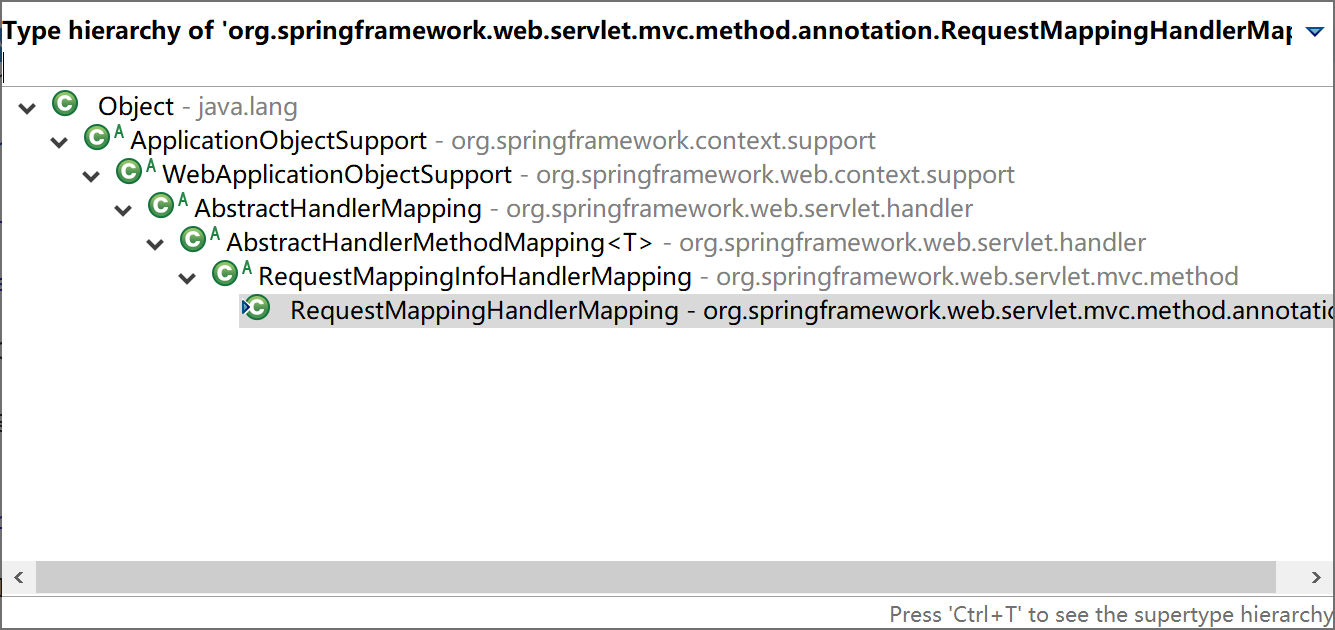
HandlerMapping 接口的最常用实现就是 RequestMappingHandlerMapping 类,具体继承层级如下图:
当然,启动过程还会在 DispatcherServlet 对象中加载 ViewResolver、MultipartResolver 等对象,这里我们不过多介绍。感兴趣的同学可以通过断点 Debug 的方式详细观察 DispatcherServlet 的加载过程。
# 4.1.2.2 前端分发器
DispatcherServlet 就是 Spring MVC 的前端分发器。
在运行时,从前端(一般都是浏览器发起一个 http 请求)过来的请求,被 DispatcherServlet 截获后,就调用 doDispatch 方法,寻求合适的处理器(参考下面代码片段中的第17行,mappedHandler = getHandler(processedRequest))处理这个请求。
protected void doDispatch(HttpServletRequest request, HttpServletResponse response) throws Exception {
    HttpServletRequest processedRequest = request;
    HandlerExecutionChain mappedHandler = null;
    boolean multipartRequestParsed = false;

    WebAsyncManager asyncManager = WebAsyncUtils.getAsyncManager(request);

    try {
        ModelAndView mv = null;
        Exception dispatchException = null;

        try {
            processedRequest = checkMultipart(request);
            multipartRequestParsed = (processedRequest != request);

            // Determine handler for the current request.
            mappedHandler = getHandler(processedRequest);
            if (mappedHandler == null) {
                noHandlerFound(processedRequest, response);
                return;
            }

            // Determine handler adapter for the current request.
            HandlerAdapter ha = getHandlerAdapter(mappedHandler.getHandler());

            // Process last-modified header, if supported by the handler.
            String method = request.getMethod();
            boolean isGet = "GET".equals(method);
            if (isGet || "HEAD".equals(method)) {
                long lastModified = ha.getLastModified(request, mappedHandler.getHandler());
                if (new ServletWebRequest(request, response).checkNotModified(lastModified) && isGet) {
                    return;
                }
            }

            if (!mappedHandler.applyPreHandle(processedRequest, response)) {
                return;
            }

            // Actually invoke the handler.
            mv = ha.handle(processedRequest, response, mappedHandler.getHandler());

            if (asyncManager.isConcurrentHandlingStarted()) {
                return;
            }

            applyDefaultViewName(processedRequest, mv);
            mappedHandler.applyPostHandle(processedRequest, response, mv);
        }
        catch (Exception ex) {
            dispatchException = ex;
        }
        catch (Throwable err) {
            // As of 4.3, we're processing Errors thrown from handler methods as well,
            // making them available for @ExceptionHandler methods and other scenarios.
            dispatchException = new NestedServletException("Handler dispatch failed", err);
        }
        processDispatchResult(processedRequest, response, mappedHandler, mv, dispatchException);
    }
    catch (Exception ex) {
        triggerAfterCompletion(processedRequest, response, mappedHandler, ex);
    }
    catch (Throwable err) {
        triggerAfterCompletion(processedRequest, response, mappedHandler,
                               new NestedServletException("Handler processing failed", err));
    }
    finally {
        if (asyncManager.isConcurrentHandlingStarted()) {
            // Instead of postHandle and afterCompletion
            if (mappedHandler != null) {
                mappedHandler.applyAfterConcurrentHandlingStarted(processedRequest, response);
            }
        }
        else {
            // Clean up any resources used by a multipart request.
            if (multipartRequestParsed) {
                cleanupMultipart(processedRequest);
            }
        }
    }
}
2
3
4
5
6
7
8
9
10
11
12
13
14
15
16
17
18
19
20
21
22
23
24
25
26
27
28
29
30
31
32
33
34
35
36
37
38
39
40
41
42
43
44
45
46
47
48
49
50
51
52
53
54
55
56
57
58
59
60
61
62
63
64
65
66
67
68
69
70
71
72
73
74
75
76
77
78
79
80
81
更详细的处理过程,请在运行时跟踪 doDispatch 了解更多。
# 4.1.2.3 控制器方法
在 Controller 中的标注了 @RequestMapping 的方法就是控制器方法,也叫处理器(handler)。
如前所述,Web 应用启动时,会将所有的处理器扫描到 DispatcherServlet 的 handlerMappings 属性中,供其 doDispatch 方法匹配合适的处理器,然后执行处理器中的逻辑。
控制器方法(处理器)一般完成前端数据的准备封装工作,然后调用服务层方法完成特定的业务逻辑功能处理。
@RequestMapping("get/{id}")
public String getUser(@PathVariable int id){
    return userService.selectUser(id).toString();
}
2
3
4
如上,getUser 方法就是控制器方法,在运行时就是一个处理器(handler)。
# 4.1.2.4 视图解析器
视图解析器决定了控制器方法返回的视图如何处理,比如 InternalResourceViewResolver 就是使用 JSP 视图技术的解析器。
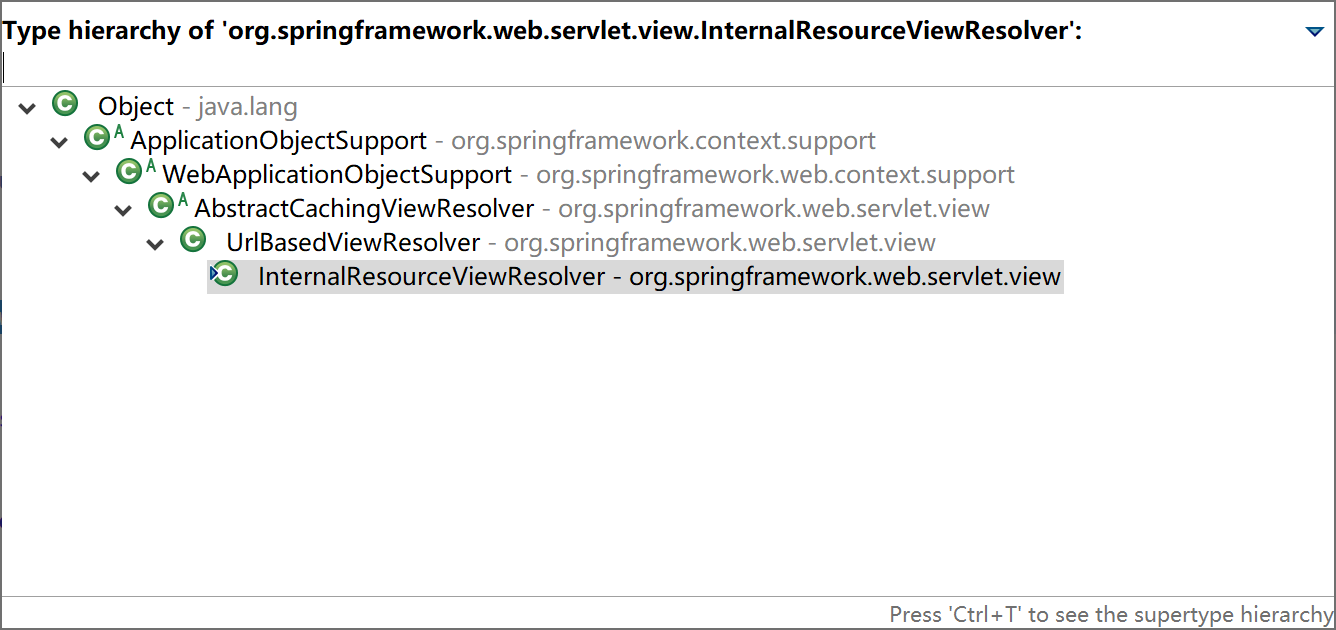
其构造器方法,会为其设置视图的前缀和后缀。
public InternalResourceViewResolver(String prefix, String suffix) {
    this();
    setPrefix(prefix);
    setSuffix(suffix);
}
2
3
4
5
在下面的配置片段场景中,如果控制器方法中返回 “hello” 字符串,则 Spring MVC 框架会找到 /WEB-INF/views/hello.jsp 这个页面(注意前缀、后缀的配置信息),来渲染给浏览器。
<!-- 这个类用于Spring MVC视图解析 -->
<beans:bean id="viewResolver"
            class="org.springframework.web.servlet.view.InternalResourceViewResolver">
    <beans:property name="prefix" value="/WEB-INF/views/" />
    <beans:property name="suffix" value=".jsp" />
</beans:bean>
2
3
4
5
6
# 4.1.2.5 动态资源
传统上,动态资源就是 JSP 文件。
一般而言,我们都会为 DispatcherServlet 配置拦截所有的前端请求,在控制器(Controller)方法返回的视图(View)中加载业务数据(Model)。
<servlet>
    <servlet-name>dispatcherServlet</servlet-name>
    <servlet-class>org.springframework.web.servlet.DispatcherServlet</servlet-class>
    <init-param>
        <param-name>contextConfigLocation</param-name>
        <param-value>classpath:META-INF/spring/springmvc-context.xml</param-value>
    </init-param>
    <load-on-startup>1</load-on-startup>
</servlet>
<servlet-mapping>
    <servlet-name>dispatcherServlet</servlet-name>
    <url-pattern>/</url-pattern>
</servlet-mapping>
2
3
4
5
6
7
8
9
10
11
12
13
# 4.1.2.6 静态资源
服务器上的视图(页面)资源,不都是 JSP 文件,还包括 JavaScript 文件、图片、CSS 样式文件等,这些就是静态资源。静态资源都是在客户浏览器端加载的,显然并不需要 DispatcherServlet 拦截处理,更不能解析到 /WEB-INF/views/arrow.png 这样的错误位置上。
Spring MVC 为静态资源提供了过滤机制。所有配置为需要过滤掉的静态资源,DispatcherServlet 在执行时内部直接放行。
<mvc:resources mapping="/./images/**" location="/./images/" />
# 4.1.2.7 一个完整的请求过程
前面,我们已经大致了解了 Spring MVC 的运行机制,下面以浏览器发起 http 请求到接收到返回结果的全过程来加深理解 Spring MVC 的处理流程。
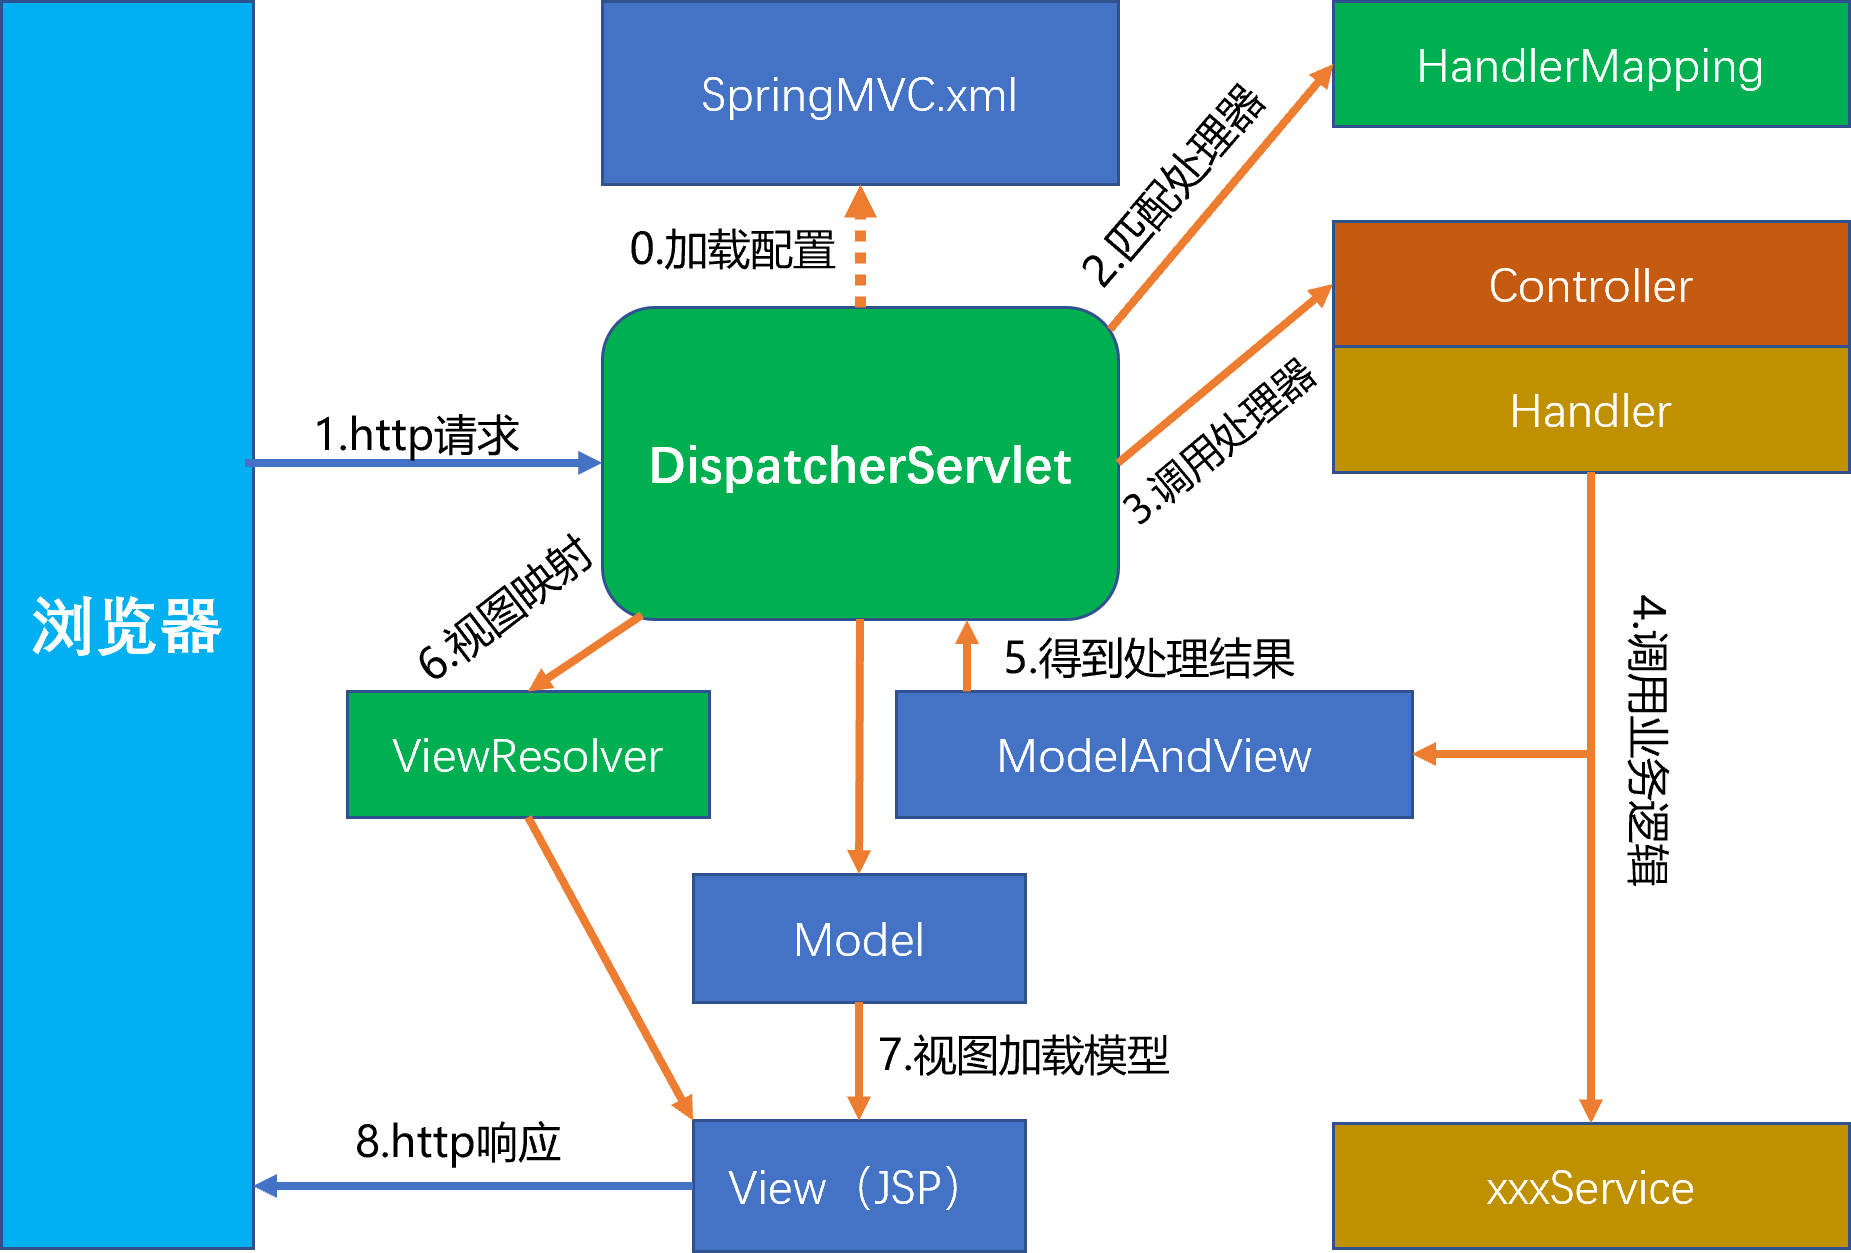
- 在Web容器启动时,Spring MVC 的 Spring 容器及前端分发器加载 SpringMVC.xml 配置文件,完成 Spring MVC 的初始化;
- 浏览器发起一个 http 请求(Request),被 DispatcherServlet 拦截到;
- DispatcherServlet 查询 handlerMappings 匹配一个handler;
- 调用 handler;
- handler 调用服务层对应的方法,完成业务逻辑处理;
- 业务逻辑返回的结果被 handler 包装到一个ModelAndView中;
- DispatcherServlet 通过 ViewResolver 获取解析视图;
- 将 Model 上的数据加载到 View 上;
- View(JSP 页面)向浏览器返回 http 响应(Response)。
# 4.1.3 传统Spring MVC示例
为了更好的观察 Spring MVC 的配置、加载、运行机制,我们以一个用 JSP 页面的 Spring MVC 项目为例,来介绍我们前面涉及到的一些知识点。
在本示例中,使用 8.5 版本的 Tomcat。
创建 maven 项目,选择 maven-archetype-webapp 骨架。
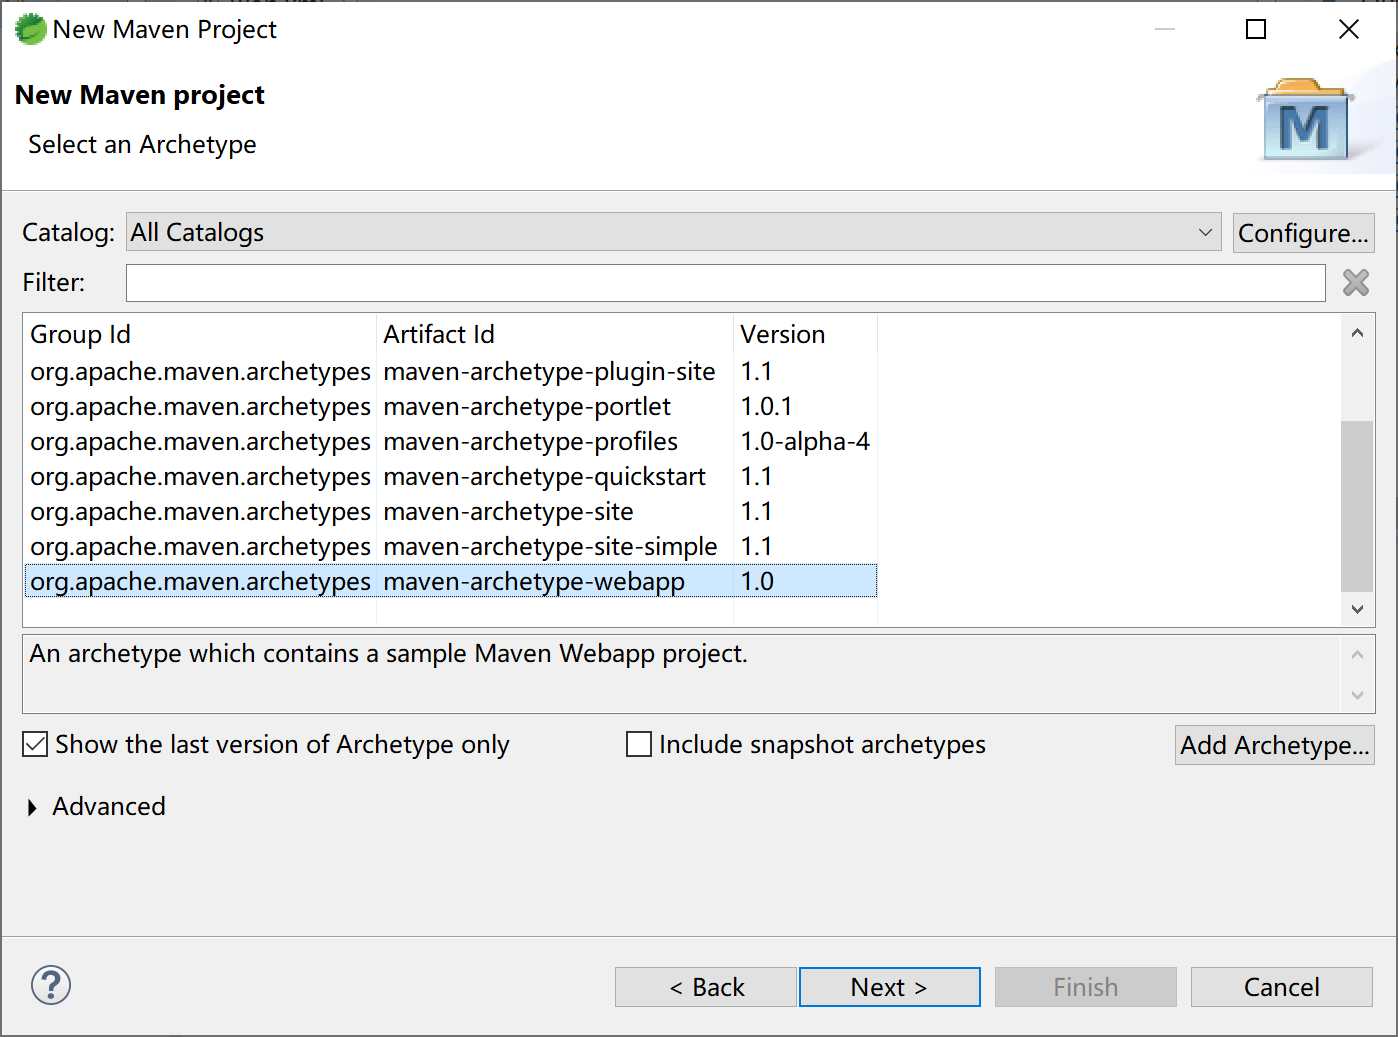
在 pom 文件中添加 Spring MVC 的依赖。
<dependency>
    <groupId>org.springframework</groupId>
    <artifactId>spring-webmvc</artifactId>
    <version>5.2.1.RELEASE</version>
</dependency>
2
3
4
5
为项目配置 web.xml:
<?xml version="1.0" encoding="UTF-8"?>
<web-app xmlns:xsi="http://www.w3.org/2001/XMLSchema-instance"
	xmlns="http://java.sun.com/xml/ns/javaee"
	xsi:schemaLocation="http://java.sun.com/xml/ns/javaee http://java.sun.com/xml/ns/javaee/web-app_3_0.xsd"
	id="WebApp_ID" version="3.0">
	<display-name>spring-mvc-jsp</display-name>
	<servlet>
		<servlet-name>SpringMVC</servlet-name>
		<servlet-class>org.springframework.web.servlet.DispatcherServlet</servlet-class>
		<init-param>
			<param-name>contextConfigLocation</param-name>
			<param-value>classpath:spring-context.xml</param-value>
		</init-param>
		<load-on-startup>1</load-on-startup>
	</servlet>
	<servlet-mapping>
		<servlet-name>SpringMVC</servlet-name>
		<url-pattern>/</url-pattern>
	</servlet-mapping>

	<welcome-file-list>
		<welcome-file>index.jsp</welcome-file>
	</welcome-file-list>
</web-app>
2
3
4
5
6
7
8
9
10
11
12
13
14
15
16
17
18
19
20
21
22
23
24
为 Spring MVC 前端分发器 DispatcherServlet 指定的配置文件为 classpath:spring-context.xml。
<beans xmlns="http://www.springframework.org/schema/beans"
	xmlns:xsi="http://www.w3.org/2001/XMLSchema-instance"
	xmlns:mvc="http://www.springframework.org/schema/mvc"
	xmlns:context="http://www.springframework.org/schema/context"
	xsi:schemaLocation="http://www.springframework.org/schema/beans
        http://www.springframework.org/schema/beans/spring-beans.xsd
        http://www.springframework.org/schema/mvc
        http://www.springframework.org/schema/mvc/spring-mvc.xsd
        http://www.springframework.org/schema/context
        http://www.springframework.org/schema/context/spring-context.xsd">

	<context:component-scan base-package="com.example"/>
	<mvc:annotation-driven/>
	<mvc:resources location="/./images/" mapping="/./images/**"/>
	<bean class="org.springframework.web.servlet.view.InternalResourceViewResolver">
		<property name="prefix" value="/WEB-INF/views"></property>
		<property name="suffix" value=".jsp"></property>
	</bean>

</beans>
2
3
4
5
6
7
8
9
10
11
12
13
14
15
16
17
18
19
20
这个文件中配置了组件扫描路径(12行)、注解驱动(13行)和静态资源过滤(14行)。
为 JSP 视图解析器 InternalResourceViewResolver 配置了前缀、后缀属性。
创建一个控制器,提供一个控制器方法(请求处理器),服务项目上下文的 /sayHello 请求路径,返回一个 ModelAndView:
- Model 中存储了模拟服务层返回的
sayHello + who + "."内容,其键值为sayHello; - View 指定为
/hello,根据视图解析器配置换算成真实文件为/WEB-INF/views/hello.jsp。
package com.example.controller;

import org.springframework.stereotype.Controller;
import org.springframework.web.bind.annotation.RequestMapping;
import org.springframework.web.servlet.ModelAndView;

@Controller
public class HelloController {

	@RequestMapping("/sayHello")
	public ModelAndView sayHello(String who) {
		ModelAndView mv = new ModelAndView();
		//模拟调用Service方法,返回问候语sayHello
		String sayHello = "Greeting! Hello ";
		mv.addObject("sayHello", sayHello + who + ".");
		mv.setViewName("/hello");
		return mv;
	}

}
2
3
4
5
6
7
8
9
10
11
12
13
14
15
16
17
18
19
20
编写 hello.jsp 文件,接收 Model 中携带的 sayHello 业务对象值(Model)。
并在其中插入一张图片,演示静态资源的使用。
<%@ page language="java" contentType="text/html; charset=UTF-8" pageEncoding="UTF-8"%>
<!DOCTYPE html>
<html>
<head>
<meta charset="UTF-8">
<title>Say Hello to WHO.</title>
</head>
<body>
	<img src="<%=request.getContextPath()%>/./images/RoyElephant.png" width="128" height="128" />
	${sayHello}
</body>
</html>
2
3
4
5
6
7
8
9
10
11
12
运行,测试,检查是否正确返回期望的结果。
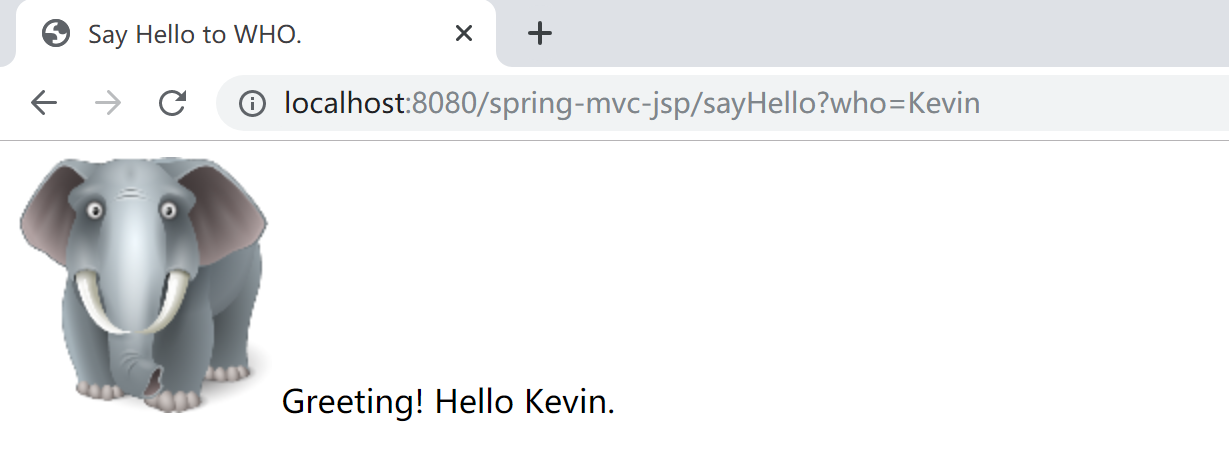
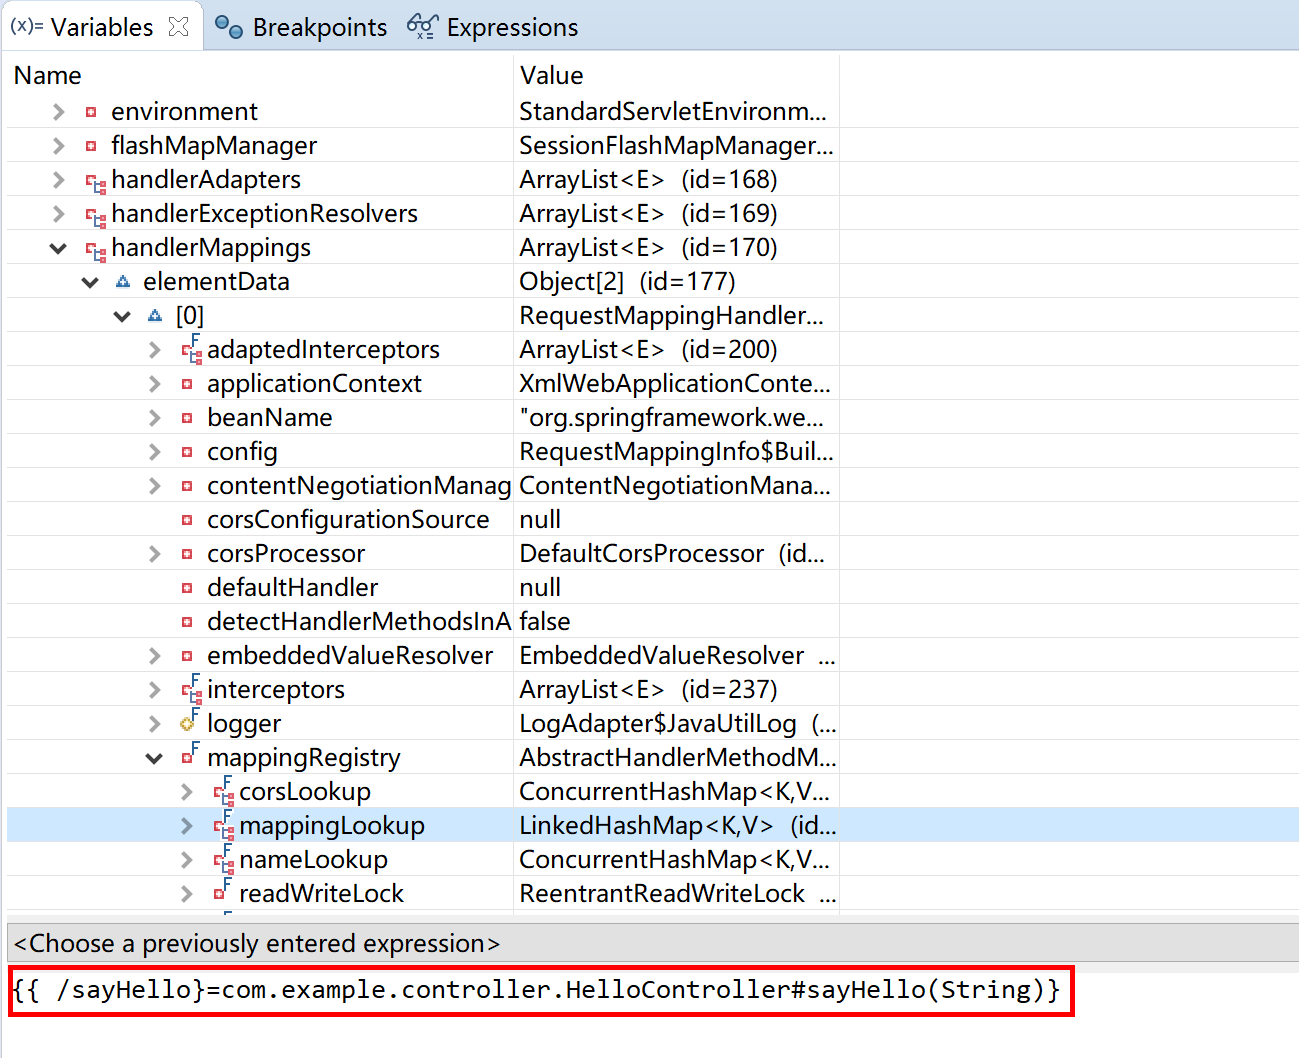
**更进一步:**可以在 Debug 模式下,设置断点,观察其内部数据。如 DispatcherServlet 的 handlerMappings 这个 List 里面注册了我们在控制器里面写的“请求处理器” sayHello(String) 这个方法。
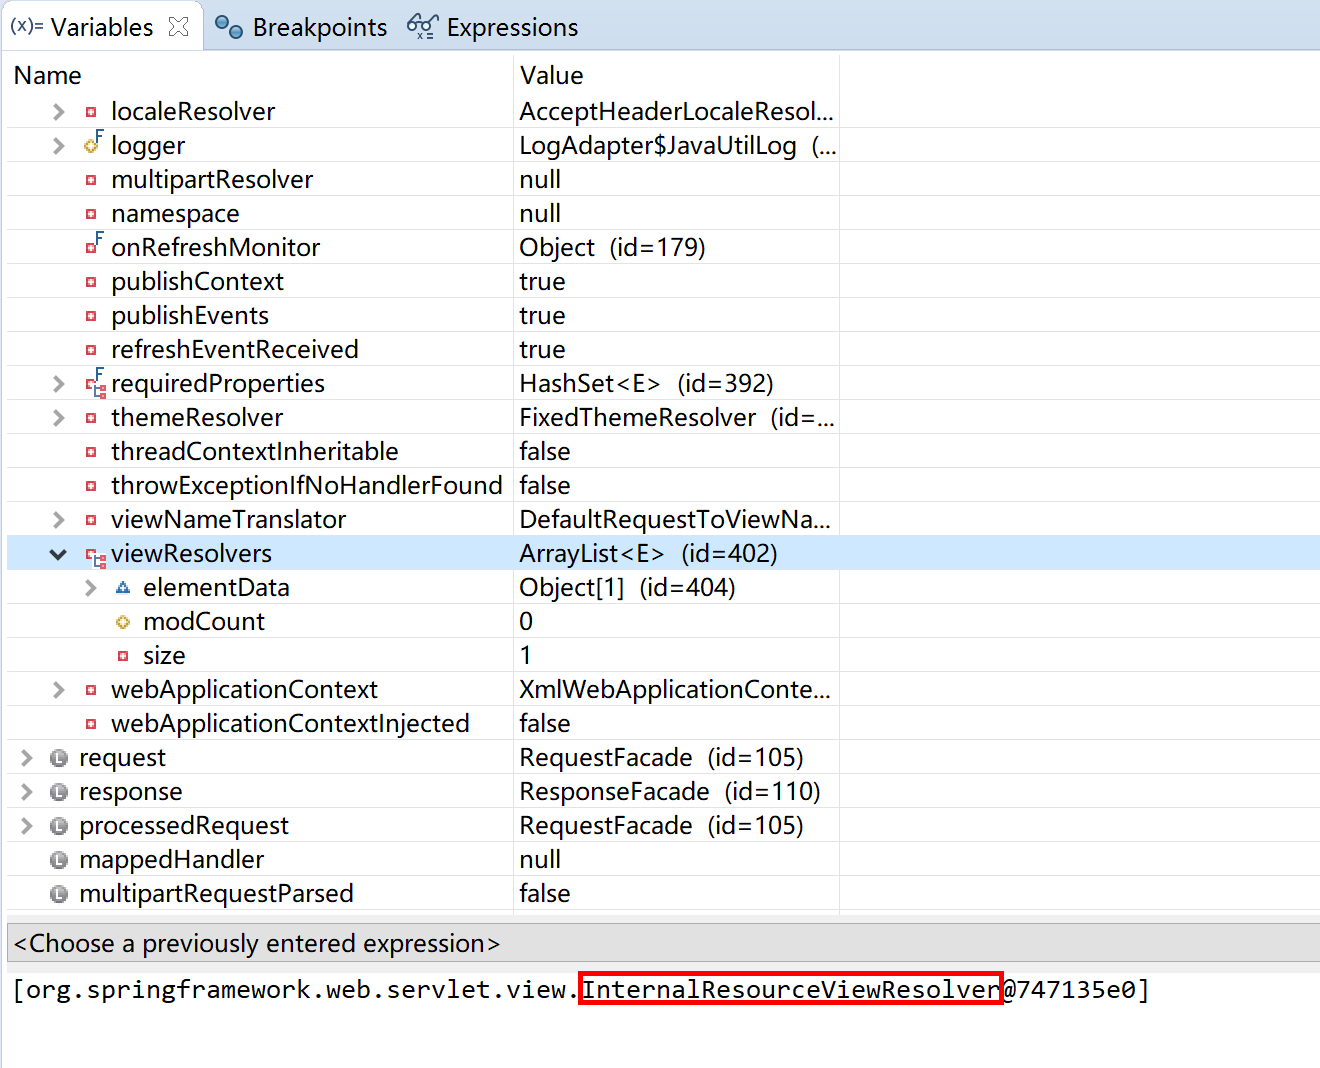
以及我们在前面配置的视图处理器 InternalResourceViewResolver。
可以清晰地看到当前请求所对应的处理器。
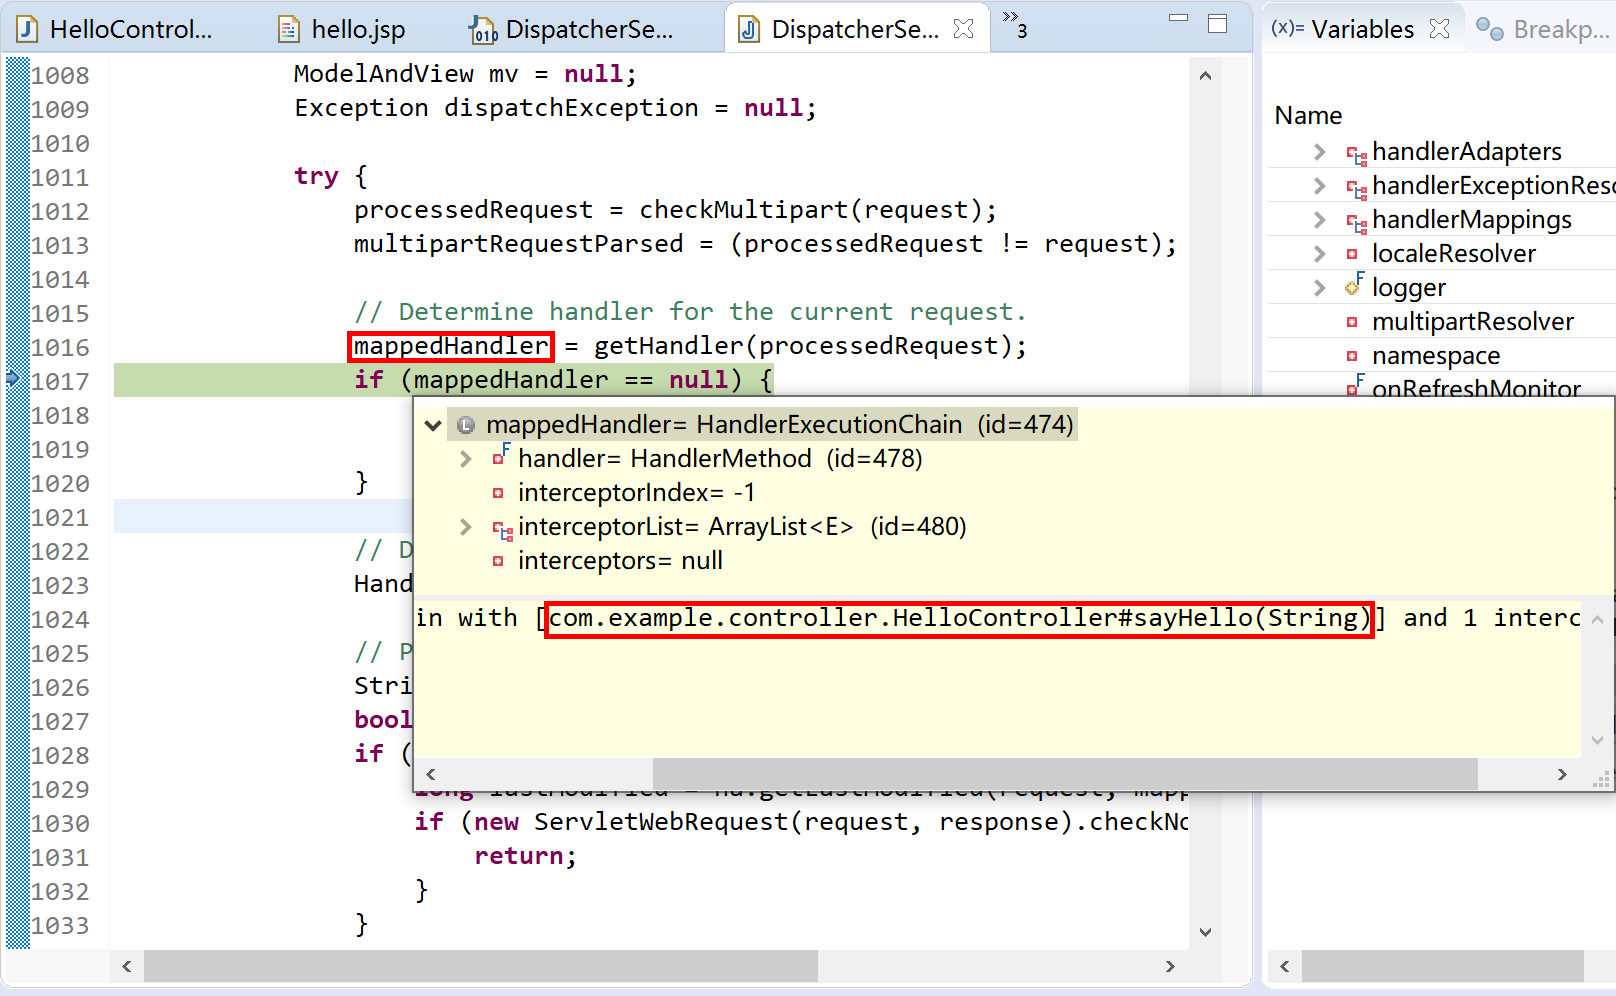
更多源码跟踪解读,请读者自行完成。
本小节示例项目代码:
https://github.com/gyzhang/SpringBootCourseCode/tree/master/spring-mvc-jsp (opens new window)
